How to Compress Images to a Specific Size (100KB, 200KB, 50KB) — 2026 Guide
😫 Still guessing percentages? Stop the trial-and-error and hit your target size (50KB, 200KB) in one go.
You're filling out a government form. Everything's ready. You hit upload and get: "File size must not exceed 100KB." Your photo is 1.8MB.
So you open Preview, drag the quality slider to 70%, export. Still 340KB. You drag it lower. Now it looks like it was shot through a frosted window. Still 180KB. You've wasted twenty minutes and your photo looks terrible.
This happens because quality percentage and file size have no fixed relationship. A "70% quality" JPEG of a plain white wall might be 30KB. The same setting on a busy street photo might be 700KB. The image content determines how much data compression has to keep — not the percentage you set. So you're not targeting a size, you're just rolling the dice.
The only reliable approach is a tool that takes a KB number as input and works backwards from there.
Find Your Target, Pick Your Tool
| Target | Where You'll Need It | Tool |
|---|---|---|
| Under 50KB | IRCTC, Aadhaar, PAN card, ration card, signature uploads | Compress to 50KB |
| Under 100KB | US DS-160 visa form, resume photos, profile pictures | Compress to 100KB |
| Under 200KB | Passport/visa applications, India OCI, most government forms | Compress to 200KB |
| Under 500KB | Blog images, email attachments, scanned documents | Compress to 500KB |
| Under 1MB | Discord uploads, government portals, general web use | Compress to 1MB |
| Under 2MB | Portfolios, photo contests, print-quality sharing | Compress to 2MB |
| Something else | Any target not listed above | Image Compressor |
Everything runs in your browser. Your files never leave your device.
What the Portals Actually Say
Most guides give you vague recommendations. Here are the real numbers from the actual portals — the ones that reject your file if you get them wrong.
Government & Visa
| Portal | Limit | Format | What to Use |
|---|---|---|---|
| US DS-160 (visa) | 54KB – 240KB | JPG only | Compress to 100KB — lands inside both ends |
| USCIS immigration | 60KB – 2MB | JPG | Compress to 200KB |
| India IRCTC | Max 50KB | JPG | Compress to 50KB |
| Aadhaar / UIDAI | Max 50KB photo, max 10KB signature | JPG | Compress to 50KB |
| India PAN card | Max 50KB | JPG | Compress to 50KB |
| India OCI portal | Max 1MB | JPG | Compress to 1MB |
| UK passport renewal | 50KB – 10MB | JPG | Usually fine as-is |
| UAE e-visa | 200KB – 5MB | JPG | Both ends enforced — Compress to 200KB |
| Australia ImmiAccount | Max 5MB | JPG or PNG | Usually fine as-is |
| Canada passport online | Max 4MB | JPG | Usually fine as-is |
One thing worth flagging about the UAE portal: it rejects files that are too small just as aggressively as files that are too large. 150KB gets bounced the same as 8MB. The 200KB minimum is real and enforced.
DS-160 has a similar trap from the other direction — the limit is 240KB, not 100KB. People over-compress to 80KB trying to be safe, then wonder why a USCIS form later complains the file is too small. Compress to 100KB puts you at around 80–100KB which clears both DS-160's floor (54KB) and USCIS's ceiling (2MB) in one shot.
Email & Work
The email limits that actually matter aren't the per-file ones — it's the total attachment size. Gmail caps at 25MB total. If you attach eight product photos at 3MB each, the email bounces. Nobody tells you this until your email to a client comes back undelivered.
A practical rule: keep individual photos under 1MB for email, and under 500KB if you're attaching more than three at once. For resumes with an embedded headshot, the whole PDF should stay under 500KB — recruiters open dozens of files and slow-loading PDFs get closed.
Web & E-commerce
Page speed is the reason to care here, not portals. Google's Core Web Vitals measure how fast your largest visible content loads (LCP). A single 2MB hero image will fail that test on mobile, which affects search rankings directly.
For blog images, under 100KB per image is a reasonable target. On a post with six inline images, that's the difference between a page that loads in 1.5 seconds and one that takes 4 seconds. At 4 seconds, most mobile readers have already left.
Shopify and WooCommerce re-compress your images on their end anyway, but starting with a smaller file means their compression has less work to do and the output looks better.
When Compression Alone Can't Get There
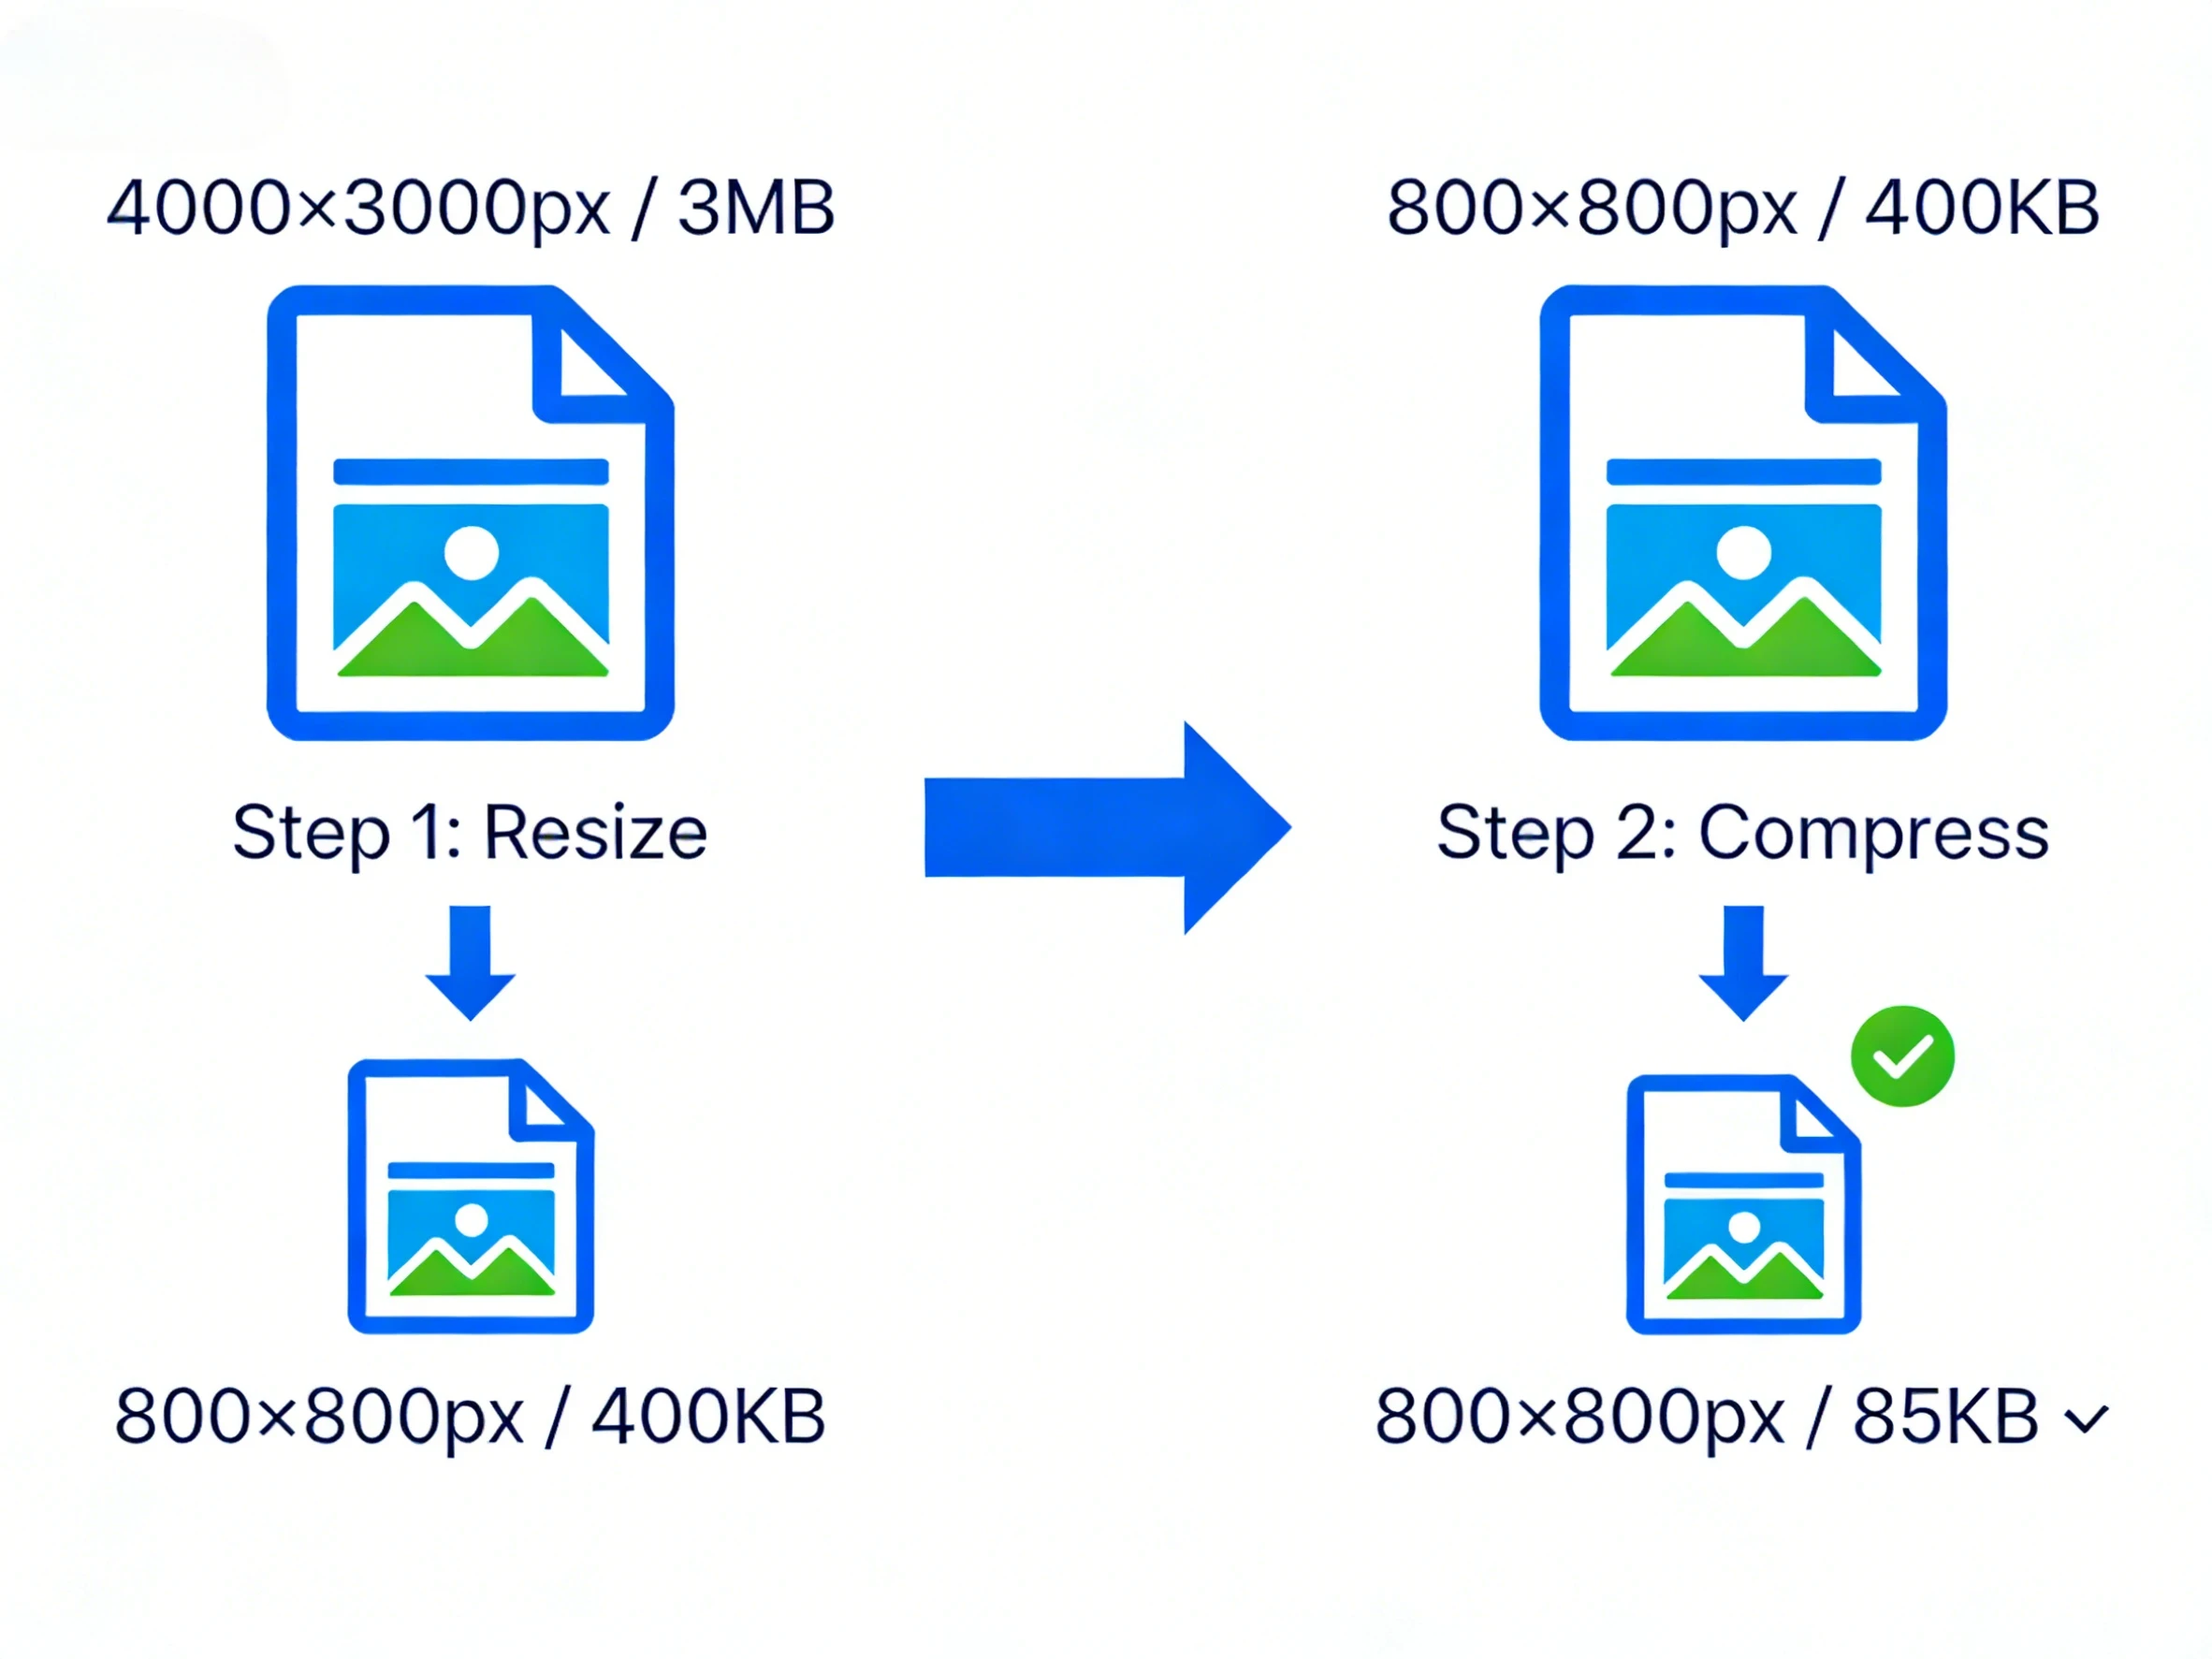
If you're trying to hit 50KB and your original is a 12MP smartphone photo, you're going to have a bad time. There's just too much data. Compressing a 4000×3000 pixel image to 50KB at acceptable quality isn't physically possible — you end up with something that looks like it was filmed underwater.
The fix is to resize the dimensions first, then compress.
A 4000×3000 image has 12 million pixels. A 600×600 image has 360,000 — about 33 times fewer. Compression on the smaller image has far less to work with, which means it can hit small targets while keeping quality reasonable.
For government form photos, the portal usually displays your photo at maybe 200×200 pixels on screen anyway. Submitting a 4000-pixel-wide image is overkill that only makes the compression harder. Bulk Image Resizer lets you bring the dimensions down first — 800×800 is plenty for almost every form upload.
For passport and ID photos specifically: crop to the correct country dimensions first (Passport Photo Cropper or 2×2 Photo Cropper), then compress. Cropping removes the background and shrinks the pixel count significantly before you've touched a compression setting.
The PNG Problem Nobody Mentions
If your file is PNG and you can't get it under 100KB no matter what you do, the format is probably fighting you. PNG stores every pixel exactly — it's lossless, which is great for logos and graphics with flat colours, but for photographs it produces files 3–5× larger than JPG for no visible quality benefit.
A 1.2MB PNG of a person's face is often 180–250KB as a JPG. That's already within most portal limits without touching a compression tool.
If your portal asks for JPG and you have a PNG: convert it first. The tool fills transparent backgrounds with white automatically. Then compress if needed.
For web use where you want the absolute smallest file, WebP typically beats JPG by another 30–50% at the same visible quality. It's supported everywhere now — Chrome, Safari, Firefox, Edge, and most CMS platforms.
What "Quality 80%" Actually Does to Your Photo
The "70–80% is unnoticeable" rule is mostly true, but it depends on what you're using the photo for.
At 85–90% quality, you'd need a side-by-side comparison on a calibrated monitor to spot the difference. File size drops 30–50% from the original. This is where you want to be for anything that gets printed or displayed large.
70–85% is the web standard — what Google's PageSpeed recommendations target. Compression artefacts are technically there but invisible at normal viewing distances. File size drops 50–70%. This is fine for blog images, product photos, social media.
Below 70%, things start to show. Fine details go soft, you might see colour banding on gradients, and high-contrast edges get a slight halo. Still usable for small thumbnails or previews, but not for anything people are going to look at closely.
For government form photos — passport, visa, ID — don't go below 80% even if it means your file is closer to the limit. The automated face recognition systems these portals use need clear detail around the eyes and facial geometry. A 190KB photo that looks clean will process better than a 90KB photo that's been aggressively compressed.
Full Workflow: DS-160 Visa Photo (Concrete Example)
DS-160 is one of the stricter portals — JPG only, 54KB–240KB, and it will reject your file silently on the upload screen with no explanation.
Check the format first. If your photo is PNG, convert to JPG before doing anything else. PNG files get rejected outright regardless of size.
Resize if the original is large. Modern smartphone photos are often 4000+ pixels wide. Bring it down to 800×800 using Bulk Image Resizer. This makes the compression step much cleaner.
Compress to target. Compress to 100KB gets you to around 80–100KB — inside DS-160's window (54–240KB) and above USCIS's minimum (60KB) if you need to use the same photo for USCIS forms.
Check the EXIF date. DS-160 and some India OCI portals read the EXIF DateTimeOriginal field embedded in your JPG. If that date is more than 6 months ago, the system can auto-reject the photo. EXIF Viewer shows you the date without uploading anything. If it's wrong because your phone's clock was off, EXIF Editor can correct it.
FAQ
Can I hit exactly 200KB, not just under it?
The target tools compress to just under the target — typically within 5–15% of the number. So a 200KB target usually produces something between 170–195KB. If your portal has a minimum as well as a maximum (UAE e-visa: 200KB–5MB), use Compress to 200KB — it'll land just inside the window on both sides.
I've compressed it three times and it's still too large. What's wrong?
Almost always a dimensions problem. Open your file and check how wide it is in pixels. If it's above 2000px wide, that's your issue — resize the dimensions first, then compress. You'll get to the target in one compression step instead of chasing it repeatedly.
I compressed to 100KB and now the portal says the file is too small.
Some portals have a minimum floor. UAE e-visa needs at least 200KB. USCIS needs at least 60KB. If you've gone below the floor, you went too aggressive — use a higher target. Compress to 200KB for UAE, and for USCIS anything above 100KB is fine.
Does compression wipe out the EXIF data?
Sometimes. Some compression processes strip EXIF metadata including the timestamp. If you're submitting to DS-160, India OCI, or UAE e-visa, check the EXIF date after compressing using EXIF Viewer. If the date got stripped or was already wrong, EXIF Editor can fix it before you submit.
Is it safe to compress passport photos and ID scans online?
Only if the tool doesn't upload your files. Most do. Your passport photo ends up on a third-party server with no clear data retention policy. BulkPicTools runs entirely in your browser — the file stays on your device, and when you close the tab, it's gone. Nothing is transmitted.
Why are there separate tools for each size instead of just one?
Convenience, mostly. If the form says "maximum 200KB," you want to click one button rather than type a number. But if you have an unusual target — say, 350KB — the Image Compressor takes any number you put in.
Portal requirements are based on official documentation as of early 2026. These change occasionally — verify on the actual form instructions before submitting.
Have questions or feedback? Contact